다운로드 Blackmagic Camera PC 용
에 의해 게시 Blackmagic Design Inc
- 카테고리: Photo & Video
- 현재 버전: 1.2.1
- 파일 크기: 36.73 MB
- 호환성: 필요 Windows 11, Windows 10/8/7/Vista
에 의해 게시 Blackmagic Design Inc

APK PC 용 - 다운로드
| 다운로드 | 개발자 | 평점 | 리뷰 |
|---|---|---|---|
|
Control Blackmagic Camera
다운로드 Apk |
SayEffect Tech Solutions Private Limited |
3.8 | 324 |
|
Control Blackmagic Camera
다운로드 Apk |
SayEffect Tech Solutions Private Limited |
3.8 | 324 |
|
Blackmagic BlueConnect
다운로드 Apk |
ConnectedApps | 3 | 83 |
|
Blackmagic Camera Control
다운로드 Apk |
Cimus | 2.5 | 106 |
|
Hypocam
다운로드 Apk |
XnView | 4.3 | 22,107 |
|
ProCam X - Lite :HD Camera Pro 다운로드 Apk |
Imagi Mobile | 4.2 | 29,951 |
확인. 먼저 첫 번째 것들. 컴퓨터에서 응용 프로그램을 사용하려면 먼저 Mac 저장소 또는 Windows 응용 프로그램 저장소를 방문하여 Bluestacks 응용 프로그램이나 Nox App 을 클릭하십시오. 웹에있는 대부분의 자습서는 Bluestacks 응용 프로그램을 권장하며 컴퓨터에서 Bluestacks 응용 프로그램을 사용하는 데 어려움이있을 경우 쉽게 온라인 솔루션을 쉽게 찾을 수 있기 때문에 Bluestacks 응용 프로그램을 권장합니다. Bluestacks Pc 또는 Mac 소프트웨어 여기 를 다운로드 할 수 있습니다.
원하는 에뮬레이터를 다운로드 했으므로 컴퓨터의 다운로드 폴더로 이동하여 에뮬레이터 또는 Bluestacks 응용 프로그램을 찾으십시오.
찾았 으면 클릭하여 응용 프로그램 또는 exe를 PC 또는 Mac 컴퓨터에 설치하십시오.
이제 Next를 클릭하여 사용권 계약에 동의하십시오.
응용 프로그램을 올바르게 설치하려면 화면 지시문을 따르십시오.
위 내용을 올바르게 수행하면 에뮬레이터 응용 프로그램이 성공적으로 설치됩니다.
설치 한 에뮬레이터 애플리케이션을 열고 검색 창을 찾으십시오. 일단 찾았 으면 Blackmagic Camera 검색 막대에서 검색을 누릅니다. 클릭 Blackmagic Camera응용 프로그램 아이콘. 의 창 Blackmagic Camera Play 스토어 또는 앱 스토어의 스토어가 열리면 에뮬레이터 애플리케이션에 스토어가 표시됩니다. Install 버튼을 누르면 iPhone 또는 Android 기기 에서처럼 애플리케이션이 다운로드되기 시작합니다. 이제 우리는 모두 끝났습니다.
"모든 앱 "아이콘이 표시됩니다.
클릭하면 설치된 모든 응용 프로그램이 포함 된 페이지로 이동합니다.
당신은 아이콘을 클릭하십시오. 그것을 클릭하고 응용 프로그램 사용을 시작하십시오.
안녕하세요. Mac 사용자!
사용하는 단계 Blackmagic Camera Mac의 경우 위의 Windows OS와 똑같습니다. Nox Application Emulator 를 설치하기 만하면됩니다. Macintosh에서 Bluestack. 여기 를 얻을 수 있습니다.
Blackmagic Camera iTunes에서
| 다운로드 | 개발자 | 평점 | 점수 | 현재 버전 | 성인 랭킹 |
|---|---|---|---|---|---|
| 무료 iTunes에서 | Blackmagic Design Inc | 356 | 4.92135 | 1.2.1 | 4+ |
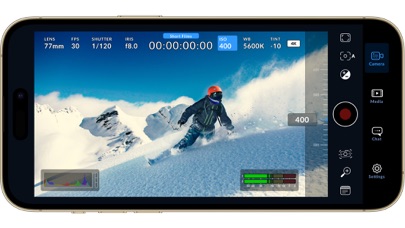
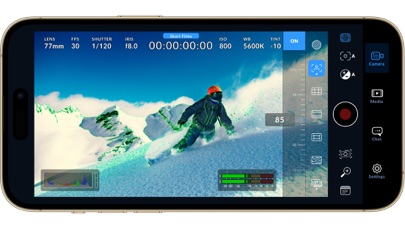
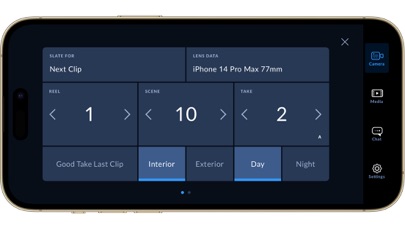
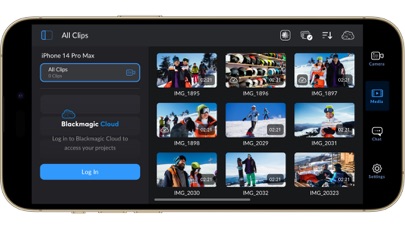
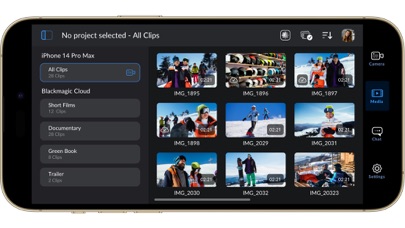
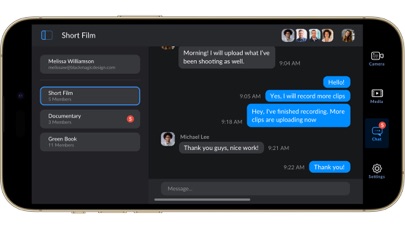
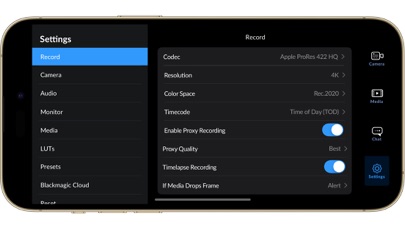
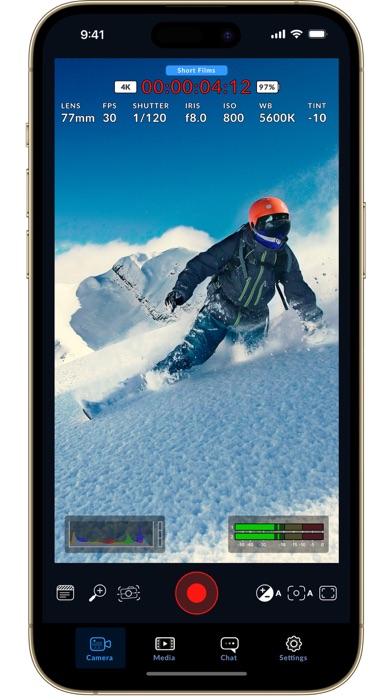
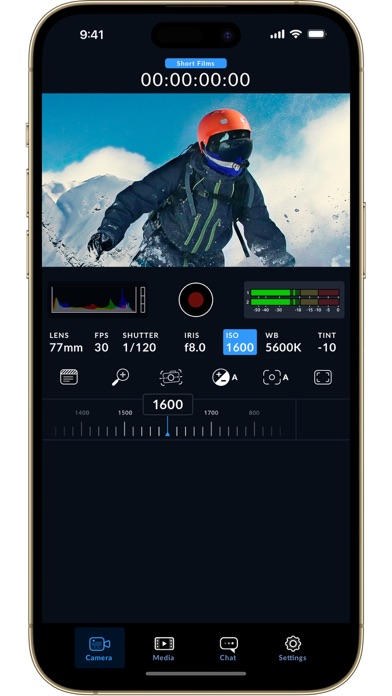
Introducing Digital Film for iPhone! Blackmagic Camera unlocks the power of your iPhone by adding digital film camera controls and operating systems! Now you can create the same cinematic ‘look’ as Hollywood feature films. You get the same intuitive and user friendly interface as Blackmagic Design’s award winning cameras. So it’s just like using a professional digital film camera! This means you can adjust settings such as frame rate, shutter angle, white balance and ISO all in a single tap. Or record directly to Blackmagic Cloud in industry standard 10-bit Apple ProRes files up to 4K! Recording to Blackmagic Cloud Storage lets you collaborate on DaVinci Resolve projects with editors anywhere in the world, all at the same time! Get the "Hollywood Look" with Digital Film! Blackmagic Camera puts the professional features you need for feature film, television and documentaries in your pocket. Now you can create YouTube and TikTok content with a cinematic look, and broadcast quality ENG! Imagine having a run and gun camera on hand to capture breaking news whenever it happens! Or use Blackmagic Camera as a B Cam to capture angles that are difficult to reach with traditional cameras, while still retaining control of important settings. Best of all, recording to Blackmagic Cloud allows you to get your footage to the newsroom or post production studio in minutes. Interactive Controls for Fast Setup Blackmagic Camera has all the controls you need to quickly setup and start shooting! Everything is interactive, so you can tap any item and instantly change settings without searching through confusing menus! The HUD shows status and record parameters, histogram, focus peaking indicators, levels, frame guides and more. Show or hide the HUD by swiping up or down. You can auto focus by tapping the screen in the area you want to focus. You can shoot in 16:9 or vertical aspect ratios, plus you can shoot 16:9 while holding your phone vertically if you want to shoot unobtrusively. On Screen Heads Up Display The heads up display, or HUD, controls have the most important camera controls such as lens selection, frame rate, shutter angle, timecode, ISO, white balance, gain and audio levels. You can adjust settings such as exposure by touching the ISO indicator, or you can change the audio levels simply by touching the audio meters. Everything is interactive, so if you tap any item you can instantaneously change its settings without having to search through complex menus! Camera Setup Menus The settings tab unlocks the full power of your phone’s camera, with quick access to advanced settings such as monitoring, audio, camera setup, recording and more! The record tab gives you total control over video resolution and recording format including industry standard Apple ProRes or space efficient H.264 and H.265. Plus, you can set anamorphic de-squeeze and lens correction settings. Professional audio options include AAC and PCM format and VU or PPM audio metering. You can even add external microphones! Or add 3D LUTs to recreate film looks! Media The Blackmagic Camera media tab has all the controls you need to browse or scrub clips for quick review, search and sort and view the upload status of your media. Access your media from Blackmagic Camera’s all clips folder by choosing the Media button to see the thumbnails for each clip you have stored. Plus, you can save to the files folder on the phone, send it to Blackmagic Cloud Storage via Blackmagic Cloud or manually choose which clips to upload to a project library. You can even sync media from Blackmagic Camera directly into the DaVinci Resolve project so you’re ready to edit! Live Sync to Blackmagic Cloud Storage When shooting with Blackmagic Camera, the video you capture can be instantly uploaded as a proxy file, followed by the camera originals, and saved to Blackmagic Cloud Storage. This means you can start editing quickly using your proxies, speeding up your workflow.