다운로드 uNetCams: Multicam & Record PC 용
에 의해 게시 UBNTEK Co., Ltd.
- 카테고리: Business
- 현재 버전: 3.0.4
- 파일 크기: 15.35 MB
- 호환성: 필요 Windows 11, Windows 10/8/7/Vista
에 의해 게시 UBNTEK Co., Ltd.


APK PC 용 - 다운로드
| 다운로드 | 개발자 | 평점 | 리뷰 |
|---|---|---|---|
|
Logitech Mevo Multicam
다운로드 Apk |
Logitech Europe S.A. | 4.2 | 170 |
|
Logitech Mevo Multicam
다운로드 Apk |
Logitech Europe S.A. | 4.2 | 170 |
|
OWLR Multi Brand IP Cam Viewer 다운로드 Apk |
OWLR Technologies | 3.8 | 2,430 |
|
ManyCam - Easy live streaming 다운로드 Apk |
ManyCam ULC | 3.7 | 4,284 |
|
FS MultiCam
다운로드 Apk |
FlightScope | 3 | 100 |
|
AlfredCamera Home Security app 다운로드 Apk |
Alfred Systems Inc. | 4.8 | 646,782 |
확인. 먼저 첫 번째 것들. 컴퓨터에서 응용 프로그램을 사용하려면 먼저 Mac 저장소 또는 Windows 응용 프로그램 저장소를 방문하여 Bluestacks 응용 프로그램이나 Nox App 을 클릭하십시오. 웹에있는 대부분의 자습서는 Bluestacks 응용 프로그램을 권장하며 컴퓨터에서 Bluestacks 응용 프로그램을 사용하는 데 어려움이있을 경우 쉽게 온라인 솔루션을 쉽게 찾을 수 있기 때문에 Bluestacks 응용 프로그램을 권장합니다. Bluestacks Pc 또는 Mac 소프트웨어 여기 를 다운로드 할 수 있습니다.
원하는 에뮬레이터를 다운로드 했으므로 컴퓨터의 다운로드 폴더로 이동하여 에뮬레이터 또는 Bluestacks 응용 프로그램을 찾으십시오.
찾았 으면 클릭하여 응용 프로그램 또는 exe를 PC 또는 Mac 컴퓨터에 설치하십시오.
이제 Next를 클릭하여 사용권 계약에 동의하십시오.
응용 프로그램을 올바르게 설치하려면 화면 지시문을 따르십시오.
위 내용을 올바르게 수행하면 에뮬레이터 응용 프로그램이 성공적으로 설치됩니다.
설치 한 에뮬레이터 애플리케이션을 열고 검색 창을 찾으십시오. 일단 찾았 으면 uNetCams: Multicam & Record 검색 막대에서 검색을 누릅니다. 클릭 uNetCams: Multicam & Record응용 프로그램 아이콘. 의 창 uNetCams: Multicam & Record Play 스토어 또는 앱 스토어의 스토어가 열리면 에뮬레이터 애플리케이션에 스토어가 표시됩니다. Install 버튼을 누르면 iPhone 또는 Android 기기 에서처럼 애플리케이션이 다운로드되기 시작합니다. 이제 우리는 모두 끝났습니다.
"모든 앱 "아이콘이 표시됩니다.
클릭하면 설치된 모든 응용 프로그램이 포함 된 페이지로 이동합니다.
당신은 아이콘을 클릭하십시오. 그것을 클릭하고 응용 프로그램 사용을 시작하십시오.
안녕하세요. Mac 사용자!
사용하는 단계 uNetCams: Multicam & Record Mac의 경우 위의 Windows OS와 똑같습니다. Nox Application Emulator 를 설치하기 만하면됩니다. Macintosh에서 Bluestack. 여기 를 얻을 수 있습니다.
uNetCams: Multicam & Record iTunes에서
| 다운로드 | 개발자 | 평점 | 점수 | 현재 버전 | 성인 랭킹 |
|---|---|---|---|---|---|
| ₩12,000 iTunes에서 | UBNTEK Co., Ltd. | 1 | 5 | 3.0.4 | 4+ |
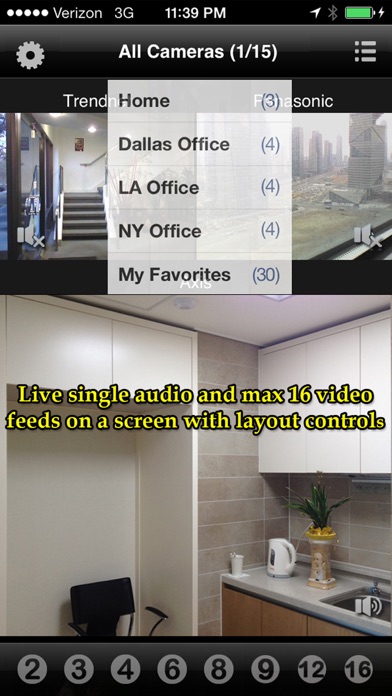
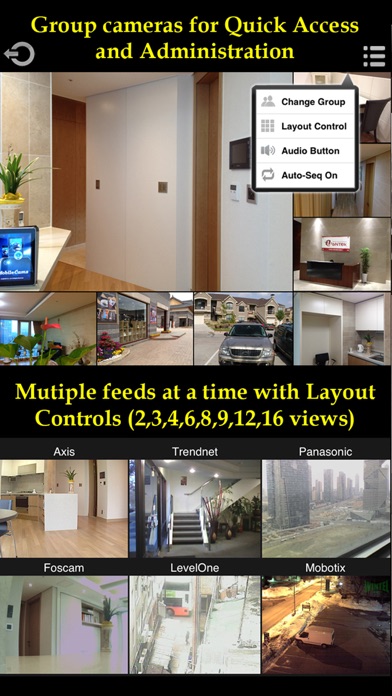
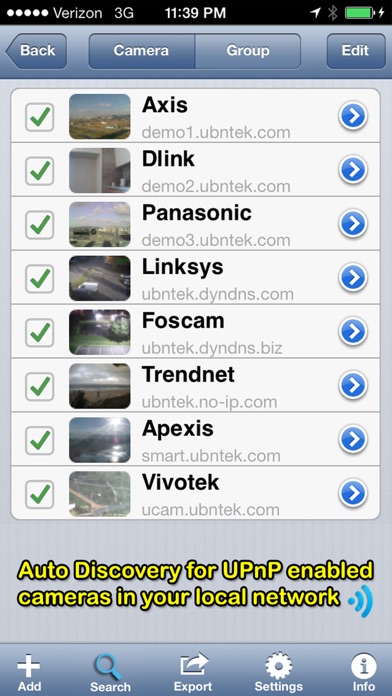
* 50% Off for A Limited Time Only! uNetCams allows you to monitor multiple live audio and video feeds directly from network cameras (1000+ models of network cameras from 100+ manufacturers) and built-in/FireWire/USB webcams with top notch performance and speed. * Main Features ▶ Unlimited number of cameras can be configured ▶ Direct access to audio and video streams from cameras. No NVR or 3rd party server is required ▶ Monitor multiple branded cameras and webcams separately located in a single app for easy access ▶ Audio support - See details at www.ubntek.com/supportedcameras/audio.html (not all models) ▶ 2 Way audio (Push to Talk) ▶ Background audio monitoring ▶ Record Audio/Video feeds to Camera Roll ▶ Automatically capture images or record videos with audio by in-app noise and motion/face detection ▶ Auto sequence monitoring for automatic cameras switching ▶ Auto patrol to preset positions according to the preset number and time interval ▶ Easily view multiple feeds simultaneously on a screen with layout controls (2, 3, 4, 6, 8, 9, 12, 16 views) ▶ Auto sequence multiviews on one screen ▶ Live single audio and max 16 video feeds on one screen ▶ Pan and Tilt controls with overlay buttons (max 8 directions) ▶ Pinch to digitally zoom and scroll to navigate the spot your desires ▶ Presets at its original center location and predefined up to 8 spots ▶ Switch IR-LED illumination for night vision on/off ▶ Activate or deactivate output port for connecting external devices ▶ Set the resolution of video image (if applicable) ▶ Enable or disable Upside Sown, Mirror, Invert Pan Tilt, Aspect Fit ▶ Quickly and easily add new models with reload button ▶ Auto-Discovery of cameras in your local network ▶ Friendly navigate cameras with the variety of portrait and landscape modes ▶ Group cameras for quick access and administration ▶ Exchange setup file between the devices via email attachment ▶ Reorder camera lists ▶ Optional cellular network alert notification ▶ Auto-Lock ▶ Passcode Lock * Supported IP Cameras - ABS, Abus, ACTi, Agasio, AirLive, Airlink, Airsight, Alecto, Allnet, American Dynamics, Apexis, Arecont, Asante, Asoni, Astak, Axis, Axis Encoder, Blue Iris, Bluecherry, Bosch, Brickcom, BSTi, Camyio, Canon, CIPCAM, Cisco, Clairvoyant, CNB, Compro, Coolcam, Corum CCTV, Cybernova, Dahua, DBpower, Dericam, Digi-Lan, Digital ID VIEW, Digitus, DiViS, D-Link, EasyN, EasySE, Edimax, ELE Technology, Elro, Eminent, ES(Eye Sight), Etrovision, Evocam3, Eyespy, ezCam, Foscam, Fuho, Gadspot, Genius, Grandstream, GrandTec, Hama, Hawking Technology, Heden, Hikvision, Hootoo, Huacam, iBaby, ICY BOX, Instar, Insteon, Ipux, IQeye, Kadymay, KaiCong, Keekoon, KKmoon, Konig, LevelOne, LILIN, Linksys, Loftek, Logilink(Hama), Lorex, Loxone, LUPUS, Luxon, Maginon, Marmitek, MayGion, Mobotix, Netbotz, NetMedia, Novibo, Orite, Panasonic, Panogenics, Planet, Planex, PyleHome, Samsung, SaveOnSecurity, Sercomm, SeQurecam, Sharx, Shixin, Showtec, SitCon, Sitecom, Smar Industry, Smart Teck, Smarthome, SMC, Sony, SparkLan, Sricam, StarDot, Storage Options, Sunluxy, Swann, Tenvis, Toshiba, Tp-link, Trek, TrendNet, TriVision, Trust, Ubiquiti, UCam247, Uvision, Vilar, Vivotek, Vivotek Encoder, Vstarcam, Wanscam, Wansview, WatchBot, WatchMeIp, Webcam123, WinStar, Wirepath, Woo, Xenta, Xvision, Y-cam, Yawcam, Zavio, Zmodo, ZyXEL, 3S Vision, 4XEM, 7Links - See details at www.ubntek.com/supportedcameras * Supported USB/FireWire/Built-in webcam (refer to the web page) - Check first if USB/FireWire/Built-in cameras properly works on the Mac and Windows - Select a model as uWebCam -> Mac or Windows * Note - Before you can control your camera(s) remotely over 3G/4G/Edge/other Wi-Fi networks, you need to setup your router to allow incoming traffic. You should read your camera’s setup manual regarding port forwarding. For more information, please see www.portforward.com or www.dyndns.org If you have any questions or comments, tap the Help button.